I am just giddy with excitement. I can't believe I actually got some ASCP and I didn't have to pay shipping. Which makes it so much better. There is this adorable store in Chandler, AZ called Green Table Gifts
SO CUTE!!! They have some really awesome things in there. Their website doesn't do it justice. I just kept walking around looking and trying to take it all in. I went just to get the ASCP. Got sidetracked, had to refocus. They are the newest stockist for Annie Sloan Chalk Paint in Arizona. YAY! Less than an hour from where I live. So happy!
The hardest part was deciding which colors to get. I ended up getting a can of the Old White and four sample pots in: Emperor's Silk, Paris Grey, Paloma, and Duck Egg Blue. Plus a can of the Dark Wax. I'm on the waiting list for the Clear Wax and those awesome round brushes.
If I thought I could justify it to Handy Hunk I probably would have gotten a sample pot in every color; all 28. At 10bucks a pop :-). See what I mean? How to justify 300 dollars worth of paint sample jars. Hmmm... I thought this one through, thankfully. But, I did buy a hand painted color chart, it was only 4 dollars. Smokin' deal. Totally justifiable.
I have a sample door in progress right now. Hopefully I will have it posted soon. Here's a sneak peek:
When we remodeled the kitchen we put in a corner cabinet with the plans of putting the smaller counter top appliances in the bottom of the cabinet. There was an outlet already there and everything. Well... when the cabinet got installed the outlet got covered up and forgotten. :-( <--big sad face. I like my coffee pot and toaster, but they're not something I like looking at all the time. My electrician/cabinet man/everything else was a work and I decided that the time had come to uncover that outlet and get it plugged in...
Here's the before picture. See the terracotta colored thing to the left of the window? That's what I was going for.
My first hole was slightly off. I forgot that we had replaced the window with a smaller one so that measurement was off. I worked my way across, 10" up from the counter. The other outlets middles are around 10", so I figured I'd get a spark eventually :-)
Second hole- strike out. Third hole- no go. Hmmmm.
OH- there's a little gap between the cabinet and the wall (thanks to nothing being perfectly straight). I flashed my flashlight down there, squinted one eye in the little crack and woohoo- I saw the outlet.
Put my trusty knitting needle into one of the holes went back and took another peek- I was pretty close. Actually, I was just on the side of it. YAY! So I started cutting/chipping/ripping it away.
Peekaboo, I'm so happy to see you!
Ended up with this. Oh- and notice that it's a GFI? Hmmm... my electrician must of replaced it before he put up the cabinet... good thing it hadn't tripped. That would of been a nightmare to figure out.
These are the culprits that get a new home. YAY!!!
Plugged them in. No problem. I'm not sure if I'm going to worry about an outlet cover or not. It'll never really be right since the cabinet will be a barrier in between the outlet and the cover. For now- this is perfect.
Looks good.
Before tile, before cutting up cabinets...
After
Now they're hidden and I have some more counter top space. And, yes the apothecary jar collection grew from the before pic to the after pic. I LOVE them. What can I say. At least they're functional. Holding the flour, sugar, sugar, sugar and candies ;-)
Sorry about the pics. I took them with my phone and to get the lighting in the dark corner cabinet I used a flashlight pointing upward. Kinda nice. I think I will have to get one of those 1990's style push light to put in this cabinet. I was so proud of my "find" yesterday. Handy Hunk had forgotten all about it. Good thing I don't let these little things go :-)
I went to Marshall's today :-) LOVE that store. Found a few things, I just had to have.
These baskets are too cute. I had seen some similar to the one in the back of the picture. I had passed them by, only to get home and wish that I had gotten them. SO, when I saw these today I snagged them up right quick. The possibilities with these little gems are endless... Candies, flowers, taking cutlery outside for BBQ's.... or succulents. Yep, that's the ticket. I used to have lots of plants around the house. However, after moving 7 times in 5years I gave away the surviving plants. Sadly, some didn't care for that much moving. Anyways- succulents shouldn't mind. I hope. But, we are kind of stuck where we're at now... So, they've got a great shot at longevity.
Went and bought these cuties.
Added rocks to the bottom then some cacti/ succulent soil... I think they're super duper adorable. They're sitting on my dining room table for now. But, when the weather gets back to normal (hot, I live in Southern AZ) I can just tote them outside for some sunshine...
I didn't paint, mend, hot glue or rebuild anything for this little project. Yet, I'm so excited to have it done. I guess I missed having little green living things around. That, and I just LOVE these baskets.
Linking up with:
I was blog surfing :-) and I read that someone had hot glued their pillowcase. (sorry, I can't remember which blog)
The following is the conversation that went on in my head. <Yes, it was a one way conversation. No voices responded. Thankfully!>
WHAT!? I thought. That's crazy. It totally has to be sewn. Why? I asked myself. I dunno. Because.... Because why? OMG I'm not a 3year old. Move on. hmmm...I don't like to sew. I have a hot glue gun. I'm totally awesome at gluing and burning my fingers.... hmmmm I should totally try this hot glue gun no sew pillow cover thing. It'll be totally awesome. Maybe I won't burn as many fingers.
Ok- back to reality. So, I did the glue gun pillow cover experiment. AWESOME!!! Love my new pillow.
This picture below is SO not my living room. Totally wish it was. Totally can't afford it. Recognize it? Its from Pottery Barn. LOVE IT!
 See the cute stripped pillows? Sew close to what I made for sew not the price. :-) I love puns.
Let me tell you about an awesome deal I got. I was at Lowes. Totally there for something else. I can't help but look at sales stickers. I'm trained. Pillows. $2.50 each. WHAT??? Yep. Totally can't pass it up. Bought them both. :-) I know, you would have too.
See the cute stripped pillows? Sew close to what I made for sew not the price. :-) I love puns.
Let me tell you about an awesome deal I got. I was at Lowes. Totally there for something else. I can't help but look at sales stickers. I'm trained. Pillows. $2.50 each. WHAT??? Yep. Totally can't pass it up. Bought them both. :-) I know, you would have too.
Navy blue houndstooth... Nice. But, it doesn't match a thing in my house. YAY! A new project.
Laid out the fabric. Cut it with a couple inches extra on the sides.
Took some pins and started to pin it how I wanted it. Folded the corners like wrapping. They actually came out pretty nice.
Started gluing in one corner and worked my way around. Folded the edges in on the piece of fabric that was making the flap to help it look finished.
Then of course added a flower. Ahhh.
Tada! LOVE it!
Linking up with:
I wish everyone was on Swap.
 Let me explain...
You have a DVD I want. I have a DVD you want. We mail them to each other and tada- we both have a new DVD (to us), we didn't have to spend a lot of money, only the cost of shipping. YAY!! Win-Win!
I'm posting this for somewhat selfish reasons. :-) I hope more people join swap- so that I can get some more swapping. :-)
I have a 2 lists on swap. On is items, books, dvd's, cd's, and or games, that I want. The other list is items, books, dvd's, cd's, and or games that I have. Then swap will match me up with someone that has them. Its not always a direct swap though. Usually several swaps involved.
I've outgrown a lot of my dvd's. And, when you try to sale them at a yard sale. Ugh! People nickle and dime you to DEATH! One of my favorite trades on Swap so far:
I had this dvd:
Let me explain...
You have a DVD I want. I have a DVD you want. We mail them to each other and tada- we both have a new DVD (to us), we didn't have to spend a lot of money, only the cost of shipping. YAY!! Win-Win!
I'm posting this for somewhat selfish reasons. :-) I hope more people join swap- so that I can get some more swapping. :-)
I have a 2 lists on swap. On is items, books, dvd's, cd's, and or games, that I want. The other list is items, books, dvd's, cd's, and or games that I have. Then swap will match me up with someone that has them. Its not always a direct swap though. Usually several swaps involved.
I've outgrown a lot of my dvd's. And, when you try to sale them at a yard sale. Ugh! People nickle and dime you to DEATH! One of my favorite trades on Swap so far:
I had this dvd:
 and I ended up with this dvd:
 .
This version of Pride and Prejudice is AWESOME!!!! I turn it on while doing my projects. Just love it. The other dvd was just sitting around. Hadn't watched it since what 1998? Its great to clean out.
Ship via media mail (WAY cheaper) and get delivery confirmation. Total is usually around 3 something. Better than the $5 bin at Walmart. :-)
It's green! And, Cheap! Plus gives the postal employees job security :-)
Hope to swap with you!
.
This version of Pride and Prejudice is AWESOME!!!! I turn it on while doing my projects. Just love it. The other dvd was just sitting around. Hadn't watched it since what 1998? Its great to clean out.
Ship via media mail (WAY cheaper) and get delivery confirmation. Total is usually around 3 something. Better than the $5 bin at Walmart. :-)
It's green! And, Cheap! Plus gives the postal employees job security :-)
Hope to swap with you!
I received an email asking about how I tiled around my electrical outlets.
The question exactly was: Did you have to move the boxes forward a bit so the outlets were flush with the tile instead of still flush with the sheetrock?
The direct answer is No, I didn't move the gang boxes at all.
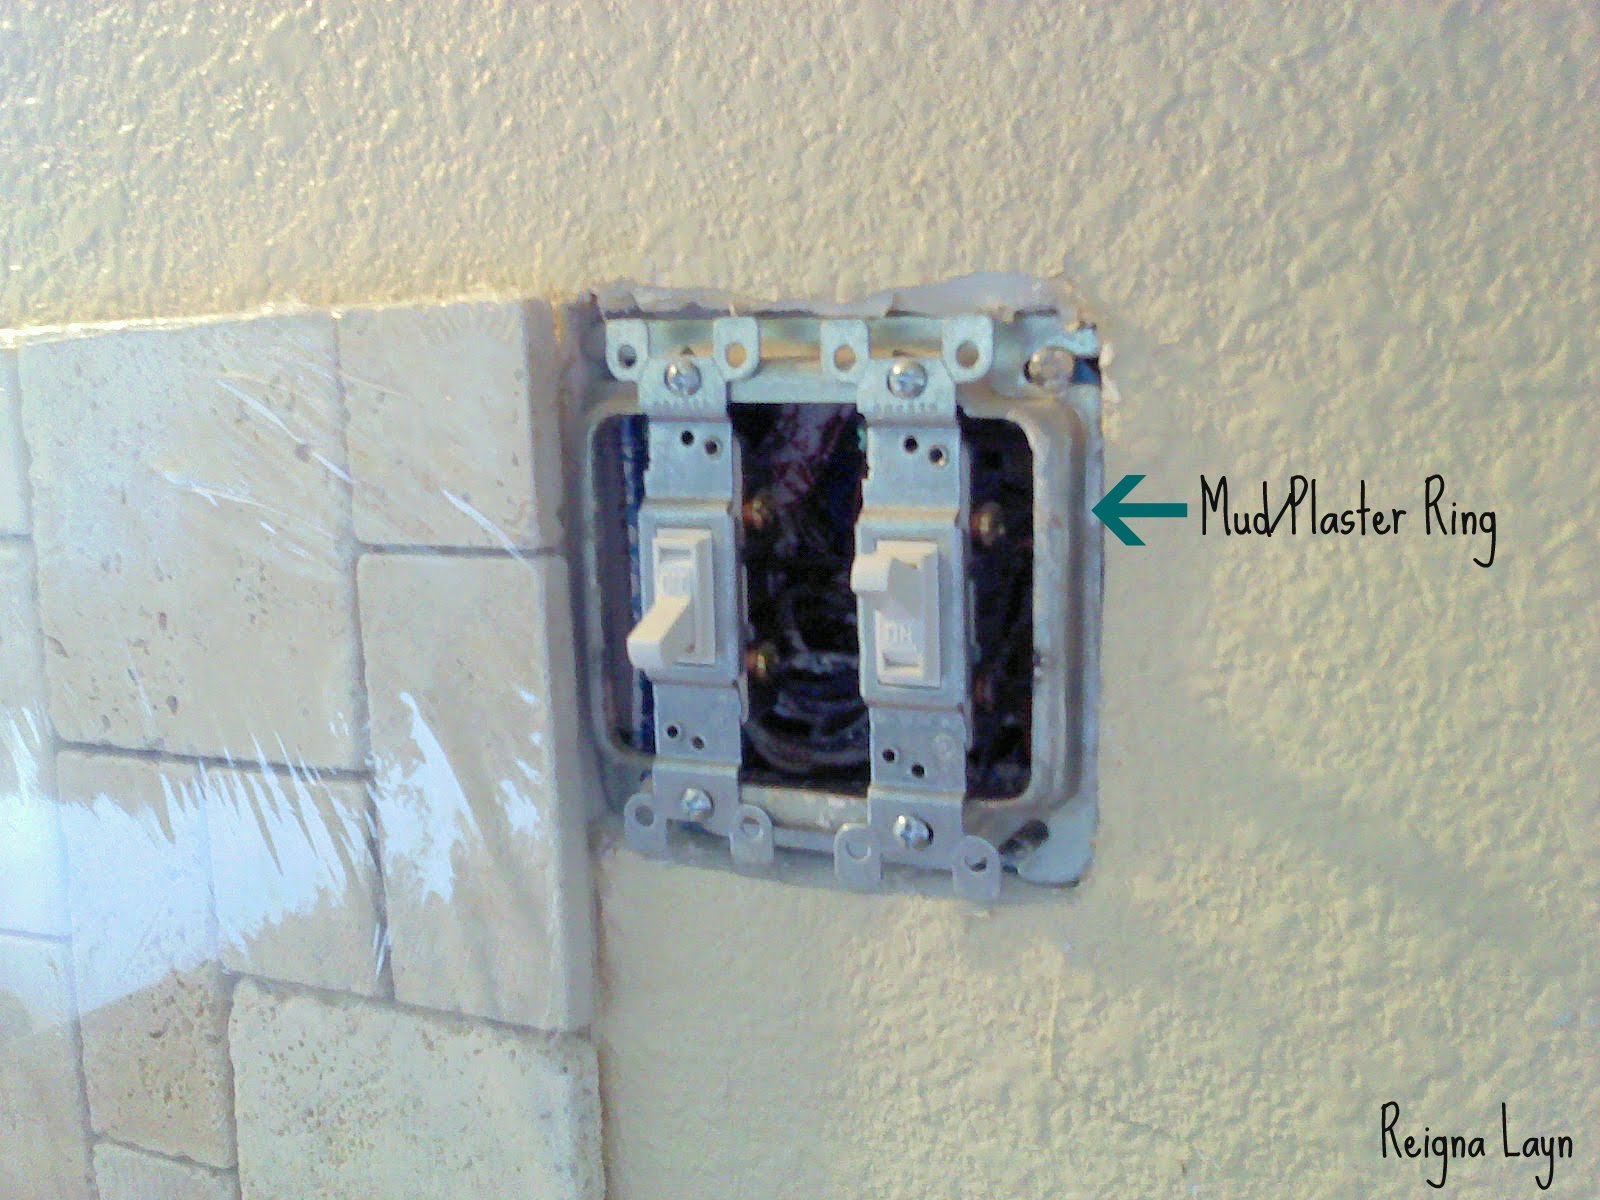
You of course have options on how to do your outlets. Initially thought we would use the bumper things, they're called plaster boxes, mud rings, and/or box extenders... the ones we bought are metal. They come in different thicknesses too. You have to put them on before you tile though. This particular double gang box had one on for months. Handy Hunk put it on there for me because I could not get the switches to line up perfectly, which doesn't work for putting on faceplates.
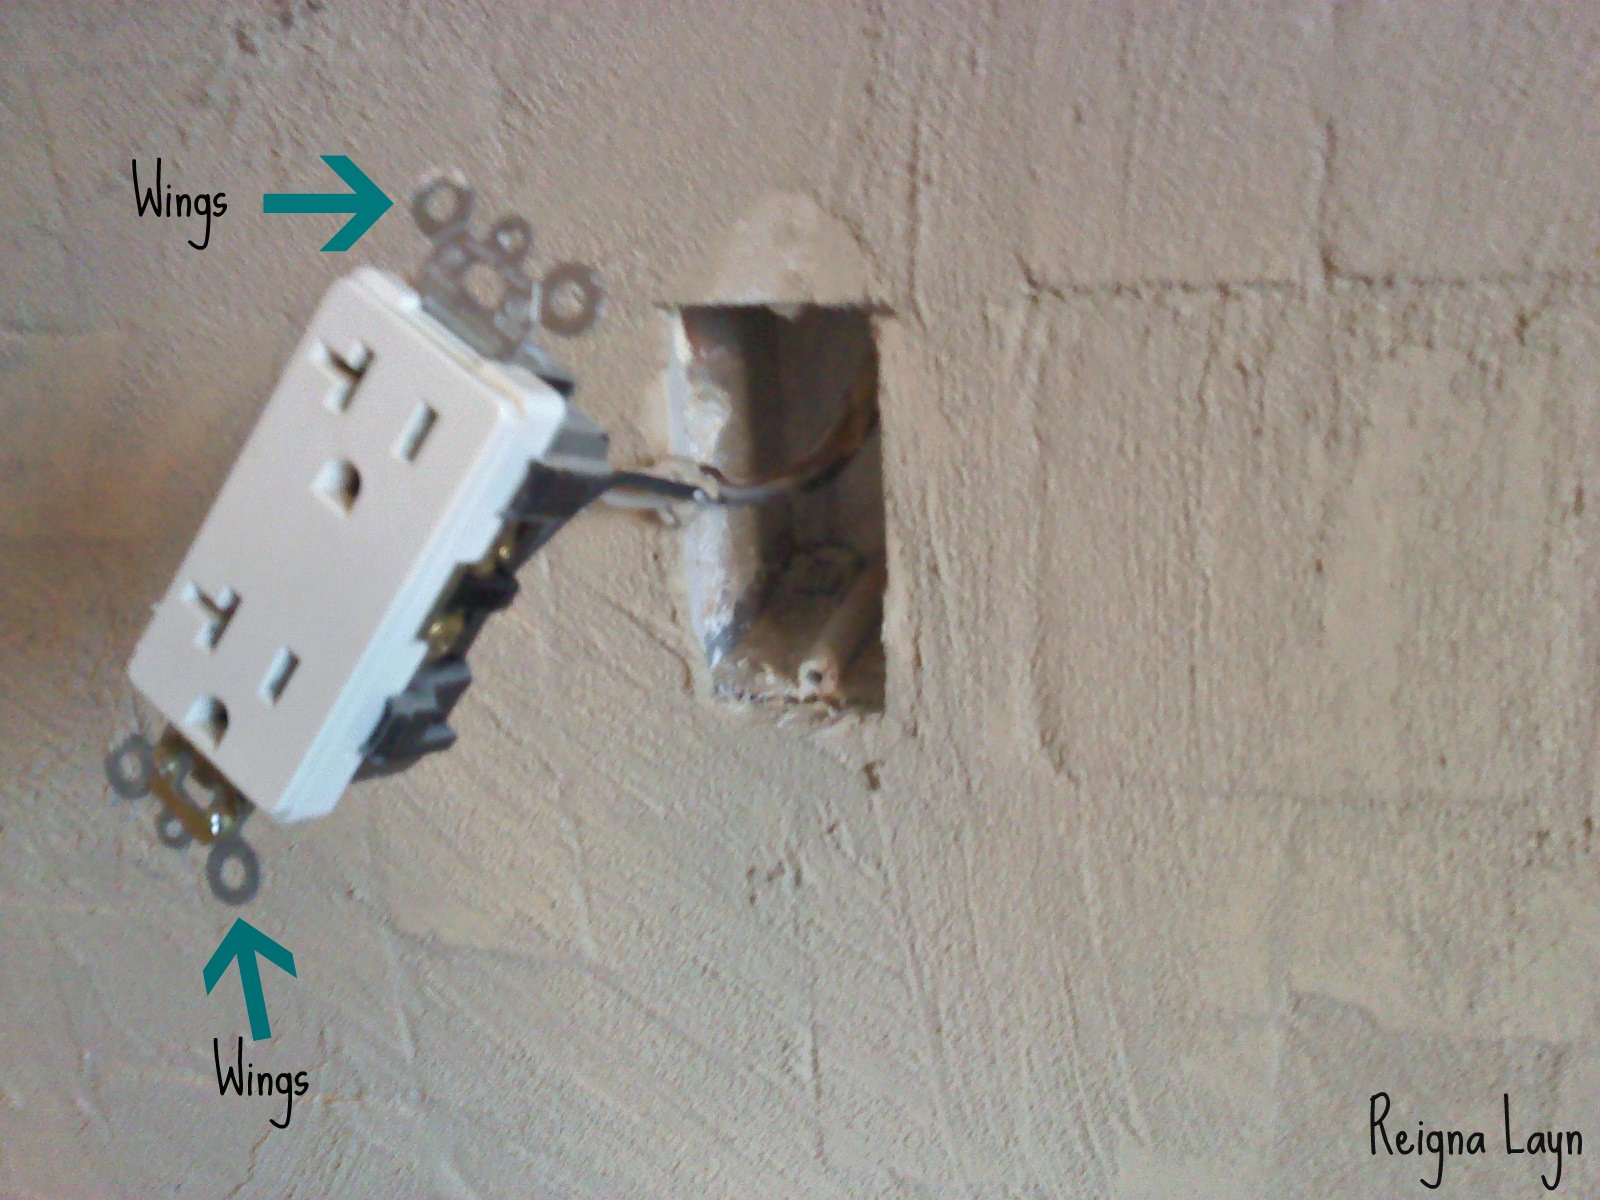
They screw directly into the gang box, as you can see above. I just didn't feel like messing around with them. Handy Hunk, who happens to be an electrician among other things, didn't have it as #1 on his priority list. SO, I got tired of waiting. What I did was that I simply unscrewed the outlets then pulled the outlets out of the gang boxes in the wall.
Then I made sure to cut my tile as close as possible to the gang box opening size.
Careful not to cover the holes for the screws (I had to fix one little spot with my tile clippers :-) )
Then when I put the outlets back the little wings (on the top and bottom of the outlets its the metal part with the really far apart Mickey Mouse ears :-) ) could rest on the tile. So, my outlets won't sink back into the gang boxes. This is where the 2" machine screws #6/32 went to work. I used those to secure the outlet back to the gang box. I already had longer faceplate screws. So I used them.
This is what I ended up with. Nice flush outlet and faceplate that covered it perfectly.
Hope this helps!